PhotoMaker : the art of AI consistent characters generation !
This tutorial is a step by step guide to run this on your Mac Silicon
This tutorial is a step by step guide to run this on your Mac Silicon
Introduction
I recently discover this amazing paper about customizing realistic human photos : PhotoMaker
The Github repository provide a Gradio example to use the model :
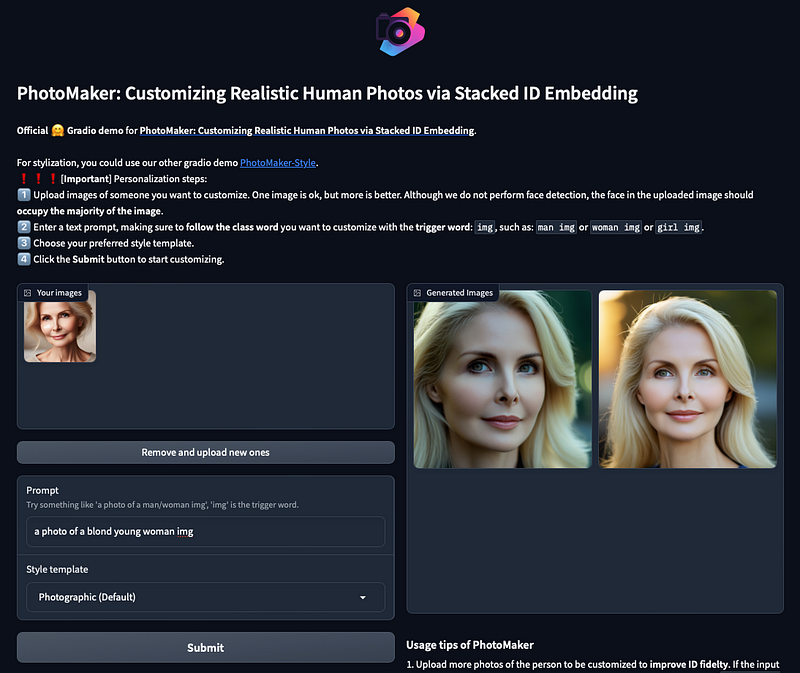
You will have to provide one or more human faces photos, of yourself for example. Then set the prompt to produce your character based on these photos.
The prompt can be anything but have to contain the trigger word “img”. ie. a photo of a blong young woman img.
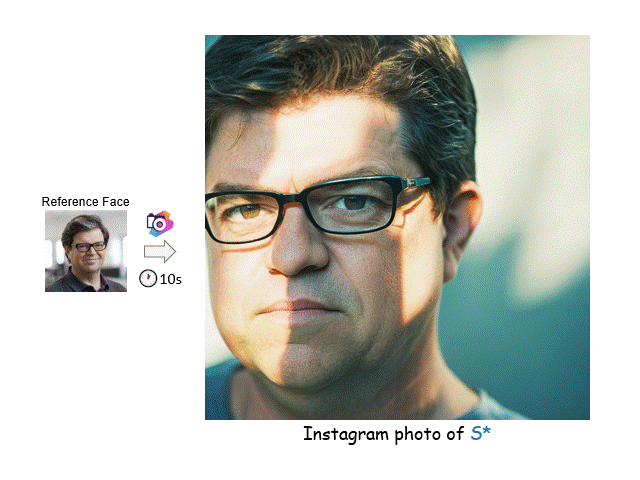
In the example above the middle age lady input photo was transformed into her younger self !
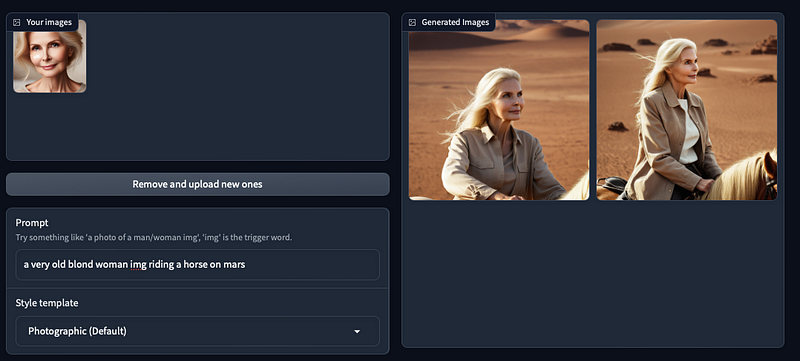
Another simple example of “a very old blond woman img riding a horse on mars”
PhotoMaker can transform input human photo into consistent characters, this is a game changer for AI consistent character generation among various scene. Even if this model has his own limitation (ie. issue with hands rendering) it is worth testing it, some results are amazing.
How to set this up and running on your Mac Silicon
A pull request has been posted to help on this, but at this moment this pull request is not yet merged.
You will then find below all the instructions to run PhotoMaker on your Mac Silicon.
Open a terminal now :
Install system dependencies
- Install xcode tools
xcode-select --install- Install llvm
You will have to install brew if you don’t have it yet. It’s quite simple
brew install llvm libompInstall PhotoMaker repository
git clone https://github.com/TencentARC/PhotoMaker.gitSetup python venv
python3  -m venv .venv

source .venv/bin/activate
Modify the file requirements.txt as follow :
torch==2.1.2
torchvision==0.16.2
diffusers
transformers
huggingface-hub
spaces
numpy
accelerate
safetensors
omegaconf
peft
gradio
Install all the python packages :
python -m pip install -r requirements.txtReplace the file “gradio_demo/app.py” with this code :
import torch
import numpy as np
import random
import os
import sys
parentdir = os.path.dirname(os.path.dirname(os.path.abspath(__file__)))
sys.path.insert(0,parentdir)
from diffusers.utils import load_image
from diffusers import EulerDiscreteScheduler
from huggingface_hub import hf_hub_download
import spaces
import gradio as gr
from photomaker.pipeline import PhotoMakerStableDiffusionXLPipeline
from gradio_demo.style_template import styles
# global variable
base_model_path = 'SG161222/RealVisXL_V3.0'
# device = "cuda" if torch.cuda.is_available() else "cpu"
try:
if torch.cuda.is_available():
device = "cuda"
elif sys.platform == "darwin" and torch.backends.mps.is_available():
device = "mps"
else:
device = "cpu"
except:
device = "cpu"
MAX_SEED = np.iinfo(np.int32).max
STYLE_NAMES = list(styles.keys())
DEFAULT_STYLE_NAME = "Photographic (Default)"
# download PhotoMaker checkpoint to cache
photomaker_ckpt = hf_hub_download(repo_id="TencentARC/PhotoMaker", filename="photomaker-v1.bin", repo_type="model")
if device == "mps":
torch_dtype = torch.float16
else:
torch_dtype = torch.bfloat16
pipe = PhotoMakerStableDiffusionXLPipeline.from_pretrained(
base_model_path,
torch_dtype=torch_dtype,
use_safetensors=True,
variant="fp16",
).to(device)
pipe.load_photomaker_adapter(
os.path.dirname(photomaker_ckpt),
subfolder="",
weight_name=os.path.basename(photomaker_ckpt),
trigger_word="img"
)
pipe.scheduler = EulerDiscreteScheduler.from_config(pipe.scheduler.config)
# pipe.set_adapters(["photomaker"], adapter_weights=[1.0])
pipe.fuse_lora()
@spaces.GPU(enable_queue=True)
def generate_image(upload_images, prompt, negative_prompt, style_name, num_steps, style_strength_ratio, num_outputs, guidance_scale, seed, progress=gr.Progress(track_tqdm=True)):
# check the trigger word
image_token_id = pipe.tokenizer.convert_tokens_to_ids(pipe.trigger_word)
input_ids = pipe.tokenizer.encode(prompt)
if image_token_id not in input_ids:
raise gr.Error(f"Cannot find the trigger word '{pipe.trigger_word}' in text prompt! Please refer to step 2️⃣")
if input_ids.count(image_token_id) > 1:
raise gr.Error(f"Cannot use multiple trigger words '{pipe.trigger_word}' in text prompt!")
# apply the style template
prompt, negative_prompt = apply_style(style_name, prompt, negative_prompt)
if upload_images is None:
raise gr.Error(f"Cannot find any input face image! Please refer to step 1️⃣")
input_id_images = []
for img in upload_images:
input_id_images.append(load_image(img))
generator = torch.Generator(device=device).manual_seed(seed)
print("Start inference...")
print(f"[Debug] Prompt: {prompt}, \n[Debug] Neg Prompt: {negative_prompt}")
start_merge_step = int(float(style_strength_ratio) / 100 * num_steps)
if start_merge_step > 30:
start_merge_step = 30
print(start_merge_step)
images = pipe(
prompt=prompt,
input_id_images=input_id_images,
negative_prompt=negative_prompt,
num_images_per_prompt=num_outputs,
num_inference_steps=num_steps,
start_merge_step=start_merge_step,
generator=generator,
guidance_scale=guidance_scale,
).images
return images, gr.update(visible=True)
def swap_to_gallery(images):
return gr.update(value=images, visible=True), gr.update(visible=True), gr.update(visible=False)
def upload_example_to_gallery(images, prompt, style, negative_prompt):
return gr.update(value=images, visible=True), gr.update(visible=True), gr.update(visible=False)
def remove_back_to_files():
return gr.update(visible=False), gr.update(visible=False), gr.update(visible=True)
def remove_tips():
return gr.update(visible=False)
def randomize_seed_fn(seed: int, randomize_seed: bool) -> int:
if randomize_seed:
seed = random.randint(0, MAX_SEED)
return seed
def apply_style(style_name: str, positive: str, negative: str = ""):
p, n = styles.get(style_name, styles[DEFAULT_STYLE_NAME])
return p.replace("{prompt}", positive), n + ' ' + negative
def get_image_path_list(folder_name):
image_basename_list = os.listdir(folder_name)
image_path_list = sorted([os.path.join(folder_name, basename) for basename in image_basename_list])
return image_path_list
def get_example():
case = [
[
get_image_path_list('./examples/scarletthead_woman'),
"instagram photo, portrait photo of a woman img, colorful, perfect face, natural skin, hard shadows, film grain",
"(No style)",
"(asymmetry, worst quality, low quality, illustration, 3d, 2d, painting, cartoons, sketch), open mouth",
],
[
get_image_path_list('./examples/newton_man'),
"sci-fi, closeup portrait photo of a man img wearing the sunglasses in Iron man suit, face, slim body, high quality, film grain",
"(No style)",
"(asymmetry, worst quality, low quality, illustration, 3d, 2d, painting, cartoons, sketch), open mouth",
],
]
return case
### Description and style
logo = r"""
<center><img src='https://photo-maker.github.io/assets/logo.png' alt='PhotoMaker logo' style="width:80px; margin-bottom:10px"></center>
"""
title = r"""
<h1 align="center">PhotoMaker: Customizing Realistic Human Photos via Stacked ID Embedding</h1>
"""
description = r"""
<b>Official 🤗 Gradio demo</b> for <a href='https://github.com/TencentARC/PhotoMaker' target='_blank'><b>PhotoMaker: Customizing Realistic Human Photos via Stacked ID Embedding</b></a>.<br>
<br>
For stylization, you could use our other gradio demo [PhotoMaker-Style](https://huggingface.co/spaces/TencentARC/PhotoMaker-Style).
<br>
❗️❗️❗️[<b>Important</b>] Personalization steps:<br>
1️⃣ Upload images of someone you want to customize. One image is ok, but more is better. Although we do not perform face detection, the face in the uploaded image should <b>occupy the majority of the image</b>.<br>
2️⃣ Enter a text prompt, making sure to <b>follow the class word</b> you want to customize with the <b>trigger word</b>: `img`, such as: `man img` or `woman img` or `girl img`.<br>
3️⃣ Choose your preferred style template.<br>
4️⃣ Click the <b>Submit</b> button to start customizing.
"""
article = r"""
If PhotoMaker is helpful, please help to ⭐ the <a href='https://github.com/TencentARC/PhotoMaker' target='_blank'>Github Repo</a>. Thanks!
[](https://github.com/TencentARC/PhotoMaker)
---
📝 **Citation**
<br>
If our work is useful for your research, please consider citing:
```bibtex
@article{li2023photomaker,
title={PhotoMaker: Customizing Realistic Human Photos via Stacked ID Embedding},
author={Li, Zhen and Cao, Mingdeng and Wang, Xintao and Qi, Zhongang and Cheng, Ming-Ming and Shan, Ying},
booktitle={arXiv preprint arxiv:2312.04461},
year={2023}
}
```
📋 **License**
<br>
Apache-2.0 LICENSE. Please refer to the [LICENSE file](https://huggingface.co/TencentARC/PhotoMaker/blob/main/LICENSE) for details.
📧 **Contact**
<br>
If you have any questions, please feel free to reach me out at <b>zhenli1031@gmail.com</b>.
"""
tips = r"""
### Usage tips of PhotoMaker
1. Upload more photos of the person to be customized to **improve ID fidelty**. If the input is Asian face(s), maybe consider adding 'asian' before the class word, e.g., `asian woman img`
2. When stylizing, does the generated face look too realistic? Try switching to our **other gradio demo** [PhotoMaker-Style](https://huggingface.co/spaces/TencentARC/PhotoMaker-Style). Adjust the **Style strength** to 30-50, the larger the number, the less ID fidelty, but the stylization ability will be better.
3. For **faster** speed, reduce the number of generated images and sampling steps. However, please note that reducing the sampling steps may compromise the ID fidelity.
"""
# We have provided some generate examples and comparisons at: [this website]().
# 3. Don't make the prompt too long, as we will trim it if it exceeds 77 tokens.
# 4. When generating realistic photos, if it's not real enough, try switching to our other gradio application [PhotoMaker-Realistic]().
css = '''
.gradio-container {width: 85% !important}
'''
with gr.Blocks(css=css) as demo:
gr.Markdown(logo)
gr.Markdown(title)
gr.Markdown(description)
# gr.DuplicateButton(
# value="Duplicate Space for private use ",
# elem_id="duplicate-button",
# visible=os.getenv("SHOW_DUPLICATE_BUTTON") == "1",
# )
with gr.Row():
with gr.Column():
files = gr.Files(
label="Drag (Select) 1 or more photos of your face",
file_types=["image"]
)
uploaded_files = gr.Gallery(label="Your images", visible=False, columns=5, rows=1, height=200)
with gr.Column(visible=False) as clear_button:
remove_and_reupload = gr.ClearButton(value="Remove and upload new ones", components=files, size="sm")
prompt = gr.Textbox(label="Prompt",
info="Try something like 'a photo of a man/woman img', 'img' is the trigger word.",
placeholder="A photo of a [man/woman img]...")
style = gr.Dropdown(label="Style template", choices=STYLE_NAMES, value=DEFAULT_STYLE_NAME)
submit = gr.Button("Submit")
with gr.Accordion(open=False, label="Advanced Options"):
negative_prompt = gr.Textbox(
label="Negative Prompt",
placeholder="low quality",
value="nsfw, lowres, bad anatomy, bad hands, text, error, missing fingers, extra digit, fewer digits, cropped, worst quality, low quality, normal quality, jpeg artifacts, signature, watermark, username, blurry",
)
num_steps = gr.Slider(
label="Number of sample steps",
minimum=20,
maximum=100,
step=1,
value=50,
)
style_strength_ratio = gr.Slider(
label="Style strength (%)",
minimum=15,
maximum=50,
step=1,
value=20,
)
num_outputs = gr.Slider(
label="Number of output images",
minimum=1,
maximum=4,
step=1,
value=2,
)
guidance_scale = gr.Slider(
label="Guidance scale",
minimum=0.1,
maximum=10.0,
step=0.1,
value=5,
)
seed = gr.Slider(
label="Seed",
minimum=0,
maximum=MAX_SEED,
step=1,
value=0,
)
randomize_seed = gr.Checkbox(label="Randomize seed", value=True)
with gr.Column():
gallery = gr.Gallery(label="Generated Images")
usage_tips = gr.Markdown(label="Usage tips of PhotoMaker", value=tips ,visible=False)
files.upload(fn=swap_to_gallery, inputs=files, outputs=[uploaded_files, clear_button, files])
remove_and_reupload.click(fn=remove_back_to_files, outputs=[uploaded_files, clear_button, files])
submit.click(
fn=remove_tips,
outputs=usage_tips,
).then(
fn=randomize_seed_fn,
inputs=[seed, randomize_seed],
outputs=seed,
queue=False,
api_name=False,
).then(
fn=generate_image,
inputs=[files, prompt, negative_prompt, style, num_steps, style_strength_ratio, num_outputs, guidance_scale, seed],
outputs=[gallery, usage_tips]
)
gr.Examples(
examples=get_example(),
inputs=[files, prompt, style, negative_prompt],
run_on_click=True,
fn=upload_example_to_gallery,
outputs=[uploaded_files, clear_button, files],
)
gr.Markdown(article)
demo.launch()Run the gradio demo interface
You should be ready to run the demo. All the modifications above are mandatory to use the MPS backend of your Apple Silicon on Torch. The out of the box demo will not work if you don’t do these steps.
python gradio_demo/app.pyThe app will first loads all the required models, be patient.
Then point you browser to this address to get the Gradio UI : http://127.0.0.1:7860
Conclusion
I hope this will help some of you, hopefully these modifications will not be necessary in the next release of PhotoMaker !
If you find this article useful, I would appreciate some claps on it !
Many thanks, and happy generating.
Comments ()